Machine Functionality: Part 1
Hello, all!
My name is Emma and I am one of two engineers for Trade N' Transit. During production, I have been in charge of several of the main game play systems that the player interacts with, and today I’ll be sharing part one of how the machines are engineered!
This chapter focuses on the initial structure of machine development - in part two, I’ll be discussing how we refactored the code, and touching on the benefits of pair programming.
To begin, I laid out what the machines needed to do:
- They needed to track how much input the machine was holding, and compare it to their max amount of input they can hold.
- If they can hold additional input, they need to remove the added resource from the player’s inventory.
- They must produce a given amount of output for each added input over time.
- Over time, the durability of the machine is reduced as it produces output.
- The player must be able to upgrade the machine efficiency (how much product is produced per one input), and the output interval (how quickly the machine produces per one input).
- Machines cannot run while the game is paused, and must only run once active in the scene.
The next step was laying out the variables I needed to accomplish the desired functionality:
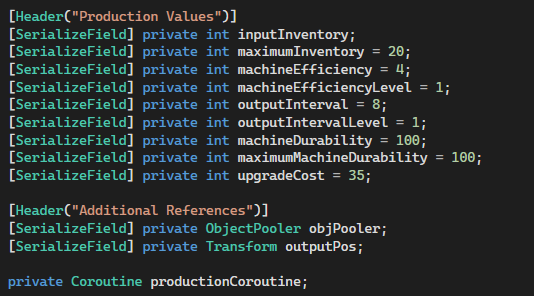
There are some additional references beneath the production values - we are using an Object Pooler to hold all of the prefabs for the different resource types. Object poolers help increase efficiency by avoiding instantiating new prefabs if there are already existing (and unused) prefabs in the scene. Instantiating new game objects as frequently as we are can get expensive quickly, so consider using an object pooler if you are doing something similar in your own project.
The transform being stored is simply where the product will be re-enabled/instantiated - it’s an empty game object that is a child of the main machine (in this case, it’ll be the 3D printer machine).
We’ll be using a coroutine to handle production over time, so it’s important to have a reference to the active coroutine in the event it needs to be stopped during run time. (StopAllCoroutines can get messy when you have several coroutines running at once.)
The next step after declaring all of the variables we think we’ll need is to actually write the coroutine we’ll be using to produce resources!
Let’s go through this line by line!
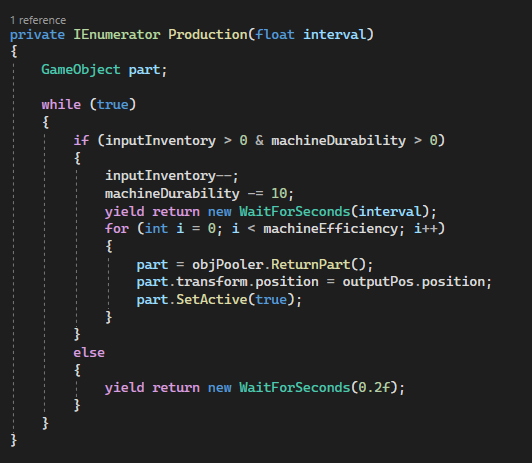
- This is a private IEnumerator called Production. It accepts a float interval to pass through.
- No other classes need access to the coroutine, so it can remain private.
- Local GameObject reference part - this is the object we’re producing.
- While(true) is technically an infinite loop - these are usually best to avoid, however, there are use cases for them, so long as they are being managed responsibly. This is necessary here as we want the coroutine to be running indefinitely - therefore, no exit criteria is provided. If we need to exit the coroutine, it’s because the coroutine needs to be stopped entirely.
- Both paths the machine can take (based on the next conditional) MUST have a yield return _, otherwise the loop can’t return to the top and will freeze the editor.
- This is an if conditional to check two things:
- If the machine has any input stored away.
- If there are no resources stored, it will not produce anything and skips to the else conditional (Step 9).
- If the machine has enough durability to produce anything.
- If the machine does not have any remaining durability, it will not produce anything and skips to the else conditional (Step 9).
- If the machine has any input stored away.
- If those conditionals are met, the coroutine then decrements the inventory by one, and reduces durability by 10.
- It then waits for the interval passed through in line 1.
- A for loop begins - it runs for an amount of time equal to machineEfficiency.
- You could do this one of two ways:
- for (int i = 0; i < machineEfficiency; i++)
- Starts at zero, exits at one less than machineEfficiency - produces an amount equal to machineEfficiency.
- for (int i = 1; i = machineEfficiency; i++)
- Starts at one, exits at i = machineEfficiency - produces an amount equal to machineEfficiency.
- for (int i = 0; i < machineEfficiency; i++)
- You could do this one of two ways:
- Inside the for loop we are:
- Asking the object pooler to assign a part prefab to the local game object part.
- If one is not already in the scene, it will instantiate one.
- Assigns the position of part equal to the outputPos.
- Sets part active in the scene (this is where the player finally sees it appear).
- Asking the object pooler to assign a part prefab to the local game object part.
- Inside of the else statement, we have the coroutine wait for 0.2 second before checking the if conditional in Step 4. This is to limit how quickly the machine checks for input, reducing the amount of checks happening in a given second during runtime.
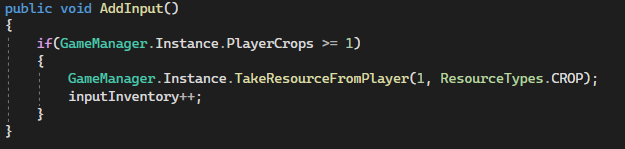
Now that the Production coroutine is finished, let’s handle the player actually inputting the desired resource (in this case, crops).
Let’s break this down:
- This method is public, as it is called when the player clicks on the machine. This relies on the interactable object system that my cohort Zeb built. In short, on a click, the player shoots out a raycast, and depending on what the raycast hits, certain methods are called (in this case, AddInput()).
- This if conditional checks if the player has any resources to add to the printer machine. As the printer accepts crops, it is checking if the player has at least one crop to put in the machine.
- If the player does not, nothing happens and no resource is input.
- If the player has at least one crop, it removes a crop from the player.
- It then increases inputInventory by one.
Pretty simple! It doesn’t need to start any coroutines, as the desired coroutine will be running constantly.
We then have to have a method for the player to repair the machine.
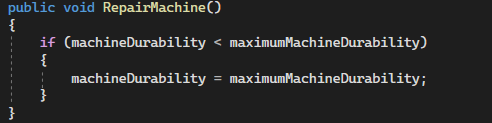
Like AddInput(), this is a public method called by the interactable object system built for this game.
- If conditional checks if the current machineDurability is less than the maximumDurability.
- If it is less than, the machineDurability is set to the maximumDurability on click.
- If it is not less than, nothing happens.
- On our machines, there are buttons the player can press to repair the machine, or upgrade it (described later).
The next step is to make sure this base functionality starts at runtime. For this, we’ll be using OnEnable and OnDisable to manage the coroutine.
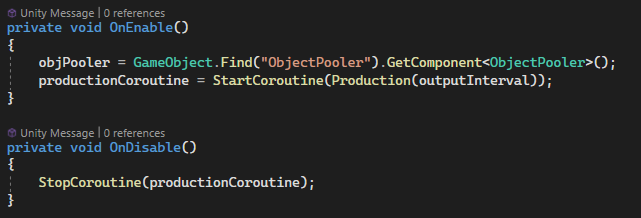
When the game object this script is attached to is enabled in the scene, it finds a reference to the object pooler used to track existing prefabs, and then begins the Production coroutine, passing outputInterval through to the coroutine.
You may have noticed that the outputInterval variable is an integer while WaitForSeconds accepts a float - and we pass a float through when starting the coroutine (interval). This is because we want to minimize any floating point errors when upgrading the outputInterval - Unity/C# automatically converts integers to floats. You can go from a float to an int, but you must use a type cast, Convert.ToInt32, or Math.Round to handle this conversion.
If the machine is disabled at any point, the coroutine is stopped. You could use StopAllCoroutines() to stop all of the coroutines on the game object, but it’s better to be precise to avoid any errors. This also allows you to add additional coroutines if you need to - and stop only the production coroutine.
Once base functionality is in, it’s time to add in functionality for upgrades!
We’ll start with upgrading the machine efficiency (how many products are produced for one input).
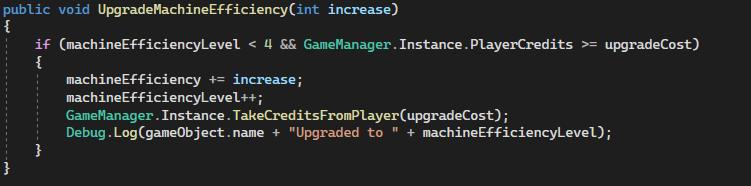
This method is public, as it is called the same way AddInput() and RepairMachine() are - via the interactable object (IO) system. It passes an integer increase through, the value of which is set in the inspector when this method is called by the IO system.
- This if statement checks if the current machineEfficiencyLevel is less than four, and if the player has enough credits to afford the upgrade.
- Currently the upgrade costs 35 credits, and each machine can only be upgraded four times per upgrade type.
- If the machine passes the if check, it then:
- Increases the machineEfficiency by the set amount increase.
- Increases the machineEfficiencyLevel by one.
- Takes the cost of the upgrade (35) from the player.
- Prints a Debug statement to confirm the machine was upgraded (just for testing purposes).
- If it doesn’t pass the if check, the machine is not upgraded and credits are not taken from the player.
The last step - upgrading the output interval of the machine! This is set up very similarly to UpgradeMachineEfficiency(), but instead passes an integer called reduction.
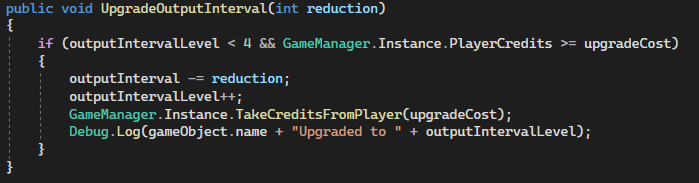
- This if statement checks if the current outputIntervalLevel is less than four, and if the player has enough credits to afford the upgrade.
- Currently the upgrade costs 35 credits, and each machine can only be upgraded four times per upgrade type.
- If the machine passes the if check, it then:
- Decreases the outputInterval by the set amount reduction.
- Increases the outputIntervalLevel by one.
- Takes the cost of the upgrade (35) from the player.
- Prints a Debug statement to confirm the machine was upgraded (just for testing purposes).
- If it doesn’t pass the if check, the machine is not upgraded and credits are not taken from the player.
Here's a sneak peek at what's coming:
Leave a comment
Log in with itch.io to leave a comment.